
How to Fix EpsonNet Config "Cannot Find Printer" or "No Devices Detected" Error
One of the most frequent hurdles encountered by network administrators and home office users when launching EpsonNet Config is the dreaded message: "No devices found on the network" or a completely empty discovery list.
Because EpsonNet Config operates by transmitting low-level MAC broadcast packets and SNMP queries rather than standard DNS lookups, ordinary Wi-Fi connectivity on your PC does not guarantee device discovery. Follow this diagnostic checklist to isolate the failure and restore communication.
1. Open Required Firewall UDP Ports (161 & 3289)
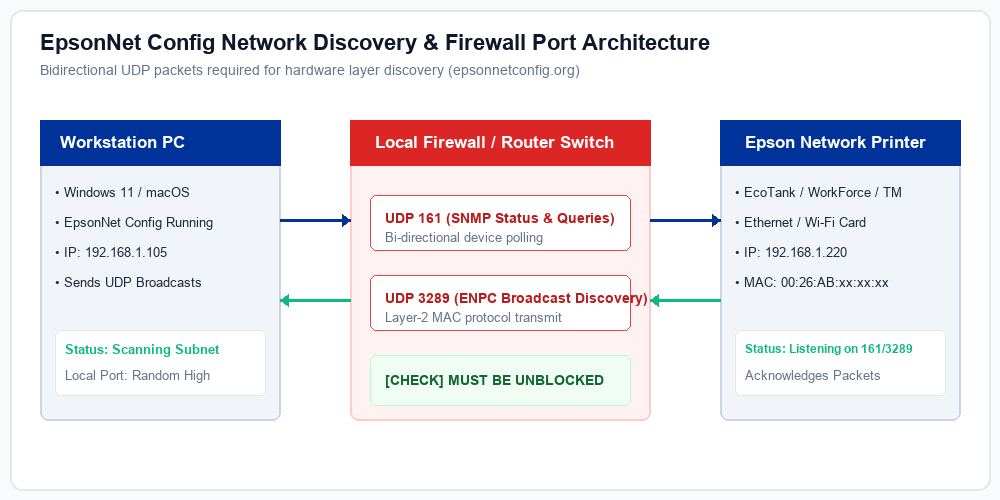
EpsonNet Config relies on two critical transport-layer network ports:
- UDP Port 161 (SNMP): Queries the printer for interface metrics, serial numbers, firmware version, and engine status.
- UDP Port 3289 (ENPC): Epson Network Protocol for Control, used to broadcast broadcast packets across the local subnet and transmit configuration changes.
If your Windows Defender Firewall or third-party endpoint security suite treats these ports as unauthorized traffic, the broadcast response is dropped silently. To create an incoming firewall rule on Windows:
netsh advfirewall firewall add rule name="EpsonNet Config Discovery" dir=in action=allow protocol=UDP localport=161,3289
2. Disconnect Active VPN Tunnels
Virtual Private Networks (VPNs) such as NordVPN, Cisco AnyConnect, or OpenVPN establish virtual network adapters that alter your operating system's routing table. When EpsonNet Config sends out discovery broadcasts, the packets are directed down the encrypted VPN tunnel rather than your physical Wi-Fi or Ethernet card. Disconnect your VPN connection before scanning for printers.
3. Verify Subnet Mask & IP Ranges
Ensure both your workstation and the Epson printer share the same IP subnet. For example:
| Device | IP Address | Subnet Mask | Status |
|---|---|---|---|
| Workstation PC | 192.168.1.105 | 255.255.255.0 | Valid |
| Epson EcoTank | 192.168.1.220 | 255.255.255.0 | Communicating |
4. Disable Wi-Fi Access Point Client Isolation
Many modern mesh routers (Eero, Google Nest Wi-Fi, Netgear Orbi) feature an enterprise security feature labeled "Client Isolation" or "Guest Network Isolation". When enabled, this feature prevents connected Wi-Fi devices from pinging or discovering each other. Log into your router admin panel and verify Client Isolation is turned off for your primary printer SSID.
5. Connect Temporarily via USB or Direct Ethernet
If your printer was never assigned a Wi-Fi password or has lost its wireless profile, attach a standard USB cable or patch Ethernet cable directly from your PC to the printer. Launch EpsonNet Config; the utility will immediately recognize the controller over the wired link, allowing you to configure the permanent Wi-Fi network credentials.
Need EpsonNet Config Software?
Download the authenticated v4.9.5 for Windows and v4.9.8 for macOS directly from our official download table with complete checksum hashes.
Go to Official Downloads →